基本所有的VPS服务器商家,都会提供免费的Linux系统供安装,比如CentOS、Debian、Ubuntu等。那为什么还要使用一键DD脚本重装/更换系统呢?
- 商家提供的系统版本有限,可能没有自己需要的版本。
- 商家的系统安装有自己不想要的服务,比如国内的阿里云盾(安骑士)。
- 商家的系统无法安装特定软件,比如很挑内核的锐速。
以上几种情况,一键DD脚本就可以为服务器更换一个纯净的系统,帮你解决问题。
所需环境
以网络流传较广的Vicer一键DD为例,其所需环境为:
架构:KVM/XEN,不支持OpenVZ。
系统:Debian/Ubuntu/CentOS
一键DD脚本使用教程
注意事项:
- Vicer脚本目前不支持重装为CentOS 7系统,支持CentOS 6.9以下版本。
- 重装的系统源自官方发行版。
- 安装过程全自动进行,无需VNC操作,无需进入救援模式。
- 系统安装完成后的默认用户名为root,默认密码为:
MoeClub.org
DD脚本示例:
由于脚本命令中需要写明目标系统版本,所以根据需求不同,最终的运行命令也各不相同。
下面提供几个使用范例,可以直接复制使用,也可以将命令中的系统版本替换为其它版本。
重装为CentOS:
以下命令中的 -c 后面为CentOS版本号,-v 后面为64位/32位,可根据需求进行替换。
|
# CentOS 6.9 64位:
|
|
|
bash <(wget —no-check-certificate -qO- ‘https://www.moeelf.com/attachment/LinuxShell/InstallNET.sh’) -c 6.9 -v 64 -a
|
|
|
# CentOS 6.9 32位:
|
|
|
bash <(wget —no-check-certificate -qO- ‘https://www.moeelf.com/attachment/LinuxShell/InstallNET.sh’) -c 6.9 -v 32 -a
|
重装为Debian:
以下命令中的 -d 后面为Debian版本号,-v 后面为64位/32位,可根据需求进行替换。
|
# Debian 8 64位:
|
|
|
bash <(wget —no-check-certificate -qO- ‘https://www.moeelf.com/attachment/LinuxShell/InstallNET.sh’) -d 8 -v 64 -a
|
|
|
# Debian 9 64位:
|
|
|
bash <(wget —no-check-certificate -qO- ‘https://www.moeelf.com/attachment/LinuxShell/InstallNET.sh’) -d 9 -v 64 -a
|
|
|
# Debian 10 64位:
|
|
|
bash <(wget —no-check-certificate -qO- ‘https://www.moeelf.com/attachment/LinuxShell/InstallNET.sh’) -d 10 -v 64 -a
|
|
|
# Debian 11 64位:
|
|
|
bash <(wget —no-check-certificate -qO- ‘https://www.moeelf.com/attachment/LinuxShell/InstallNET.sh’) -d 11 -v 64 -a
|
重装为Ubuntu:
以下命令中的 -u 后面为Ubuntu版本号,-v 后面为64位/32位,可根据需求进行替换。
|
# Ubuntu 12.04 64位:
|
|
|
bash <(wget —no-check-certificate -qO- ‘https://www.moeelf.com/attachment/LinuxShell/InstallNET.sh’) -u 12.04 -v 64 -a
|
|
|
# Ubuntu 14.04 64位:
|
|
|
bash <(wget —no-check-certificate -qO- ‘https://www.moeelf.com/attachment/LinuxShell/InstallNET.sh’) -u 14.04 -v 64 -a
|
|
|
# Ubuntu 16.04 64位:
|
|
|
bash <(wget —no-check-certificate -qO- ‘https://www.moeelf.com/attachment/LinuxShell/InstallNET.sh’) -u 16.04 -v 64 -a
|
|
|
# Ubuntu 18.04 64位:
|
|
|
bash <(wget —no-check-certificate -qO- ‘https://www.moeelf.com/attachment/LinuxShell/InstallNET.sh’) -u 18.04 -v 64 -a
|
|
|
# Ubuntu 20.04 64位:
|
|
|
bash <(wget —no-check-certificate -qO- ‘https://www.moeelf.com/attachment/LinuxShell/InstallNET.sh’) -u 20.04 -v 64 -a
|
关于系统重装过程
运行包含正确系统版本号的脚本后,新系统的安装会自动进行,无需人工干预。
可能的三种情况:
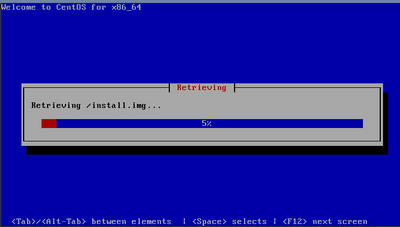
正常情况下10分钟左右就可以安装成功了,期间可以在VNC中观察安装过程:
如果安装CentOS 7版本,会出现下图提示,表示不支持:
如果输入了其它不支持或不存在的系统版本,则会出现下图提示,中止安装:
重装系统后更改root密码
耐心等待系统安装成功后,出于安全考虑,建议立即更改默认密码。
具体方法:
1、使用Putty以上文提供的默认密码登录,输入以下命令:passwd root
2、接下来会分两次要求输入新的密码,可以手动输入,也可以在其它位置复制一个密码,然后在Putty界面右键点击即可粘贴上去。
注意:输入新密码时并不会直接显示出来,光标也不会移动,这是正常的。
3、再次登录系统时,记得使用新的root密码。


必须 注册 为本站用户, 登录 后才可以发表评论!