Introduction
This tutorial covers the installation of a Windows operating system on dedicated hardware without using a KVM console.
Prerequisites
- A dedicated server running in a Rescue System
- More than 8 GB RAM in the server
Step 1 – Prepare Server
Once the server is in the Rescue System (Linux x64), the following software must be installed:
apt update && apt install qemu-kvmNext, a Windows ISO must be transferred to the server. Possible options are:
- Upload via sFTP
- Mount an SMB / NFS storage (Storage Box)
- Downloading the ISO from Microsoft / Hetzner
On the Hetzner Mirror there are also Windows ISOs (these can only be downloaded from the Hetzner network):
Windows Server 2019
Windows Server 2016
Windows Server 2012
The system drive still has to be prepared after connecting the ISO. A partition table must be created.
Attention All data on the drive(s) will be deleted.
Start parted on the desired drive:
parted /dev/sdbCreating the partition table for drives smaller than 2 TB:
mklabel msdosCreating the partition table for drives larger than 2 TB:
mklabel gptThe whole thing should look something like this:
root@rescue ~ # parted /dev/sda
GNU Parted 3.2
Using /dev/sda
Welcome to GNU Parted! Type 'help' to view a list of commands.
(parted) [mklabel msdos]
Warning: The existing disk label on /dev/sda will be destroyed and all data on this disk will be
lost. Do you want to continue?
Yes/No? [yes]
(parted) [quit]
Information: You may need to update /etc/fstab.
All inputs are bordered with
[ ]
Step 2 – Creating an SSH tunnel
For later installation via VNC an SSH tunnel is required. Otherwise the installation can be accessed openly over the Internet.
On Linux and Windows with OpenSSH installed, simply run the following command locally and log on to the server:
ssh -L 8888:127.0.0.1:5901 root@your_hostStep 3 – Starting the Windows installation
Now you can start with the actual Windows installation. To do this, the following command (modified accordingly) must be executed on the server.
qemu-system-x86_64 -enable-kvm -smp 4 -m 4096 -boot d -cdrom en_windows_server_2019_updated_sept_2019_x64_dvd_199664ce.iso -drive file=/dev/sda,format=raw,media=disk -vnc 127.0.0.1:1| Options | |
|---|---|
| -smp | Number of CPU cores |
| -m | Size of the used RAM |
| -cdrom | Path to ISO image |
| -drive | hard disk on which the system is to be installed |
| -vnc | VNC Server Settings |
Next, the installation can be started via VNC. You can connect to a VNC viewer of your choice at the following address:
127.0.0.1:8888Step 4 – Automatic IP configuration
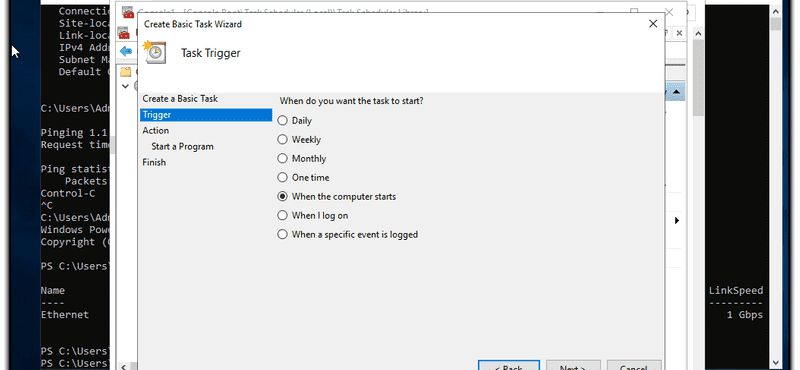
A scheduled task must be created that executes the following PowerShell script, which will add the correct network configuration to the server when it boots from the Windows installation.
foreach($Adapter in Get-NetAdapter)
{
    New-NetIPAddress –IPAddress [IPAdresse] -DefaultGateway [Gateway] -PrefixLength [CIDR] -InterfaceIndex $Adapter.InterfaceIndex
}
The values in the brackets must be adjusted accordingly and the script should then be stored under ‘C:\script.ps1’.
Use these steps to set up the scheduled task:
- Set startup options

- Define actions

- Enter PowerShell options
-ExecutionPolicy Bypass -File C:\script.ps1

- Task options overview

- Security options here should be set that the script also starts without a user login.

Step 5 – Enable RDP & Disable Firewall
To connect to the server via RDP later, this must be activated:

To minimize further sources of error it makes sense to deactivate the Windows Firewall before restarting (but this is optional).
Now Windows can be shutdown and the server restarted. After a few minutes it should be possible to connect to the server via RDP.
Step 6 – Disable script
Now the scheduled task should be deactivated again and the firewall should be checked accordingly and switched on again. In the network settings, DNS servers should also be defined, as these were not set with the script.
Conclusion
This tutorial covered the installation of a Windows operating system without the use of a KVM console.
要发表评论,您必须先登录。